I’ve been using ZSA’s new Voyager keyboard for a few weeks now.
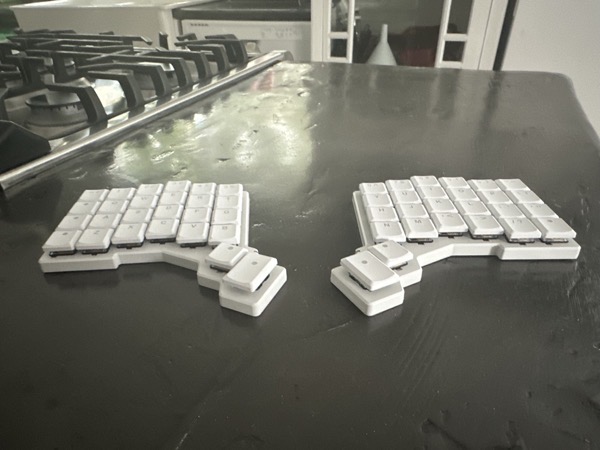
The first thing that hits you when you unbox it is how damn thin it is. It’s not just thinner because it’s using low-profile Choc switches (and similarly low-profile keycaps), the actual case of the keyboard itself is considerably thinner than even the Moonlander (whose thinness I was impressed by as well).
This keyboard was made with portability at top of mind. Its footprint is tiny and minimalist compared to the Moonlander (which itself is capable of being quite small on a desk when the wrist rests are removed), and it’s quick to set up with tenting legs that magnetically attach to the bottom of the keyboard with a decidedly satisfying click.
Build quality is quite possibly ZSA’s best yet. Everything feels built to tight tolerances, and the keyboard strikes a good balance between feeling solid but remaining light, with the case’s bottom being metal and the plastic of the keyboard case and the key caps feeling perfectly nice. The keys all have a solid feel with minimal wiggle or play. The keyboard feels properly premium.
If you are accustomed to full-sized keyboards you might find the lower profile to be a bit jarring. The keyswitches have the premium feel and full-depth travel that you would find in other mechanical keyboards, but the keycaps are flat and even, not at all unlike a laptop’s keyboard.
Customization: Layout
If you are looking at a photo of the Voyager, you might look at the key layout and think that makes no sense to you.
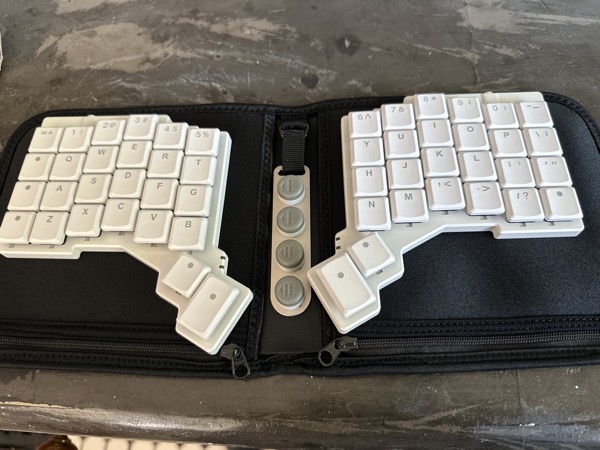
And that’s okay, because the Voyager’s key layout is whatever you want it to be. It’s a fully programmable keyboard. And when I say the keyboard is fully programmable, I mean the keyboard is fully programmable; this isn’t some janky third party software you have to install on whatever device you want to use it with. When you program the Voyager keyboard, the layout you program becomes the keyboard’s real layout.
You might also look at the keyboard’s spartan 52 keys and find that intimidating, and you might be imagining a weeks-long learning curve to get up to speed typing. But in reality, you’ll pick it up very fast! On a small keyboard like this, different keys will be doing double duty (or more) and since there are only 52 keys to learn, your fingers will develop muscle memory fast.
You can customize the keyboard’s layout using ZSA’s online configurator tool, or you can use the new Keymapp app (which doubles as the app you use to flash the firmware to the keyboard once you’ve decided on a layout).
Keys can be customized in a number of ways. Of course, you can assign keys on any position on the keyboard. But the real power in the Voyager’s programmability is in the extra capabilities you can give keys, which is important on a keyboard with just 52 physical keys.
You can have multiple virtual keyboard layers and assign a key that will switch the keyboard to that layer (and you can make that work like a shift key, or a toggle where tapping the key switches to another layer, and tapping again switches back). Every layer is its own full layout, and if you want a layer where just a few keys are different, you can do that and leave the remainder of the keys as-is. By default a key on another layer is transparent and will just fall back to whatever the same key does on the layer below. If you typed a lot of German, for instance, you could have a sort of shift key that shifts vowels to umlauts but leaves everything else untouched.
And even within a layer keys can do more than one thing . You can have a key that does one thing when you tap it and something else when you hold it, like my key that’s Esc when I tap and Ctrl when I hold. You could set up a key that does one thing when you tap it and another thing when you double-tap it (again, potentially handy if you type in languages that have letters with diacritical marks). You can even have keys that can perform an entire keyboard shortcut in one keystroke. No finger acrobatics for you!
And the amazing thing is that once you realize that you have the power to just change how your keyboard works, it gets really addicting to just pop into the configurator and make that change. When devices are this willing to be customized you can’t help but feel delighted.
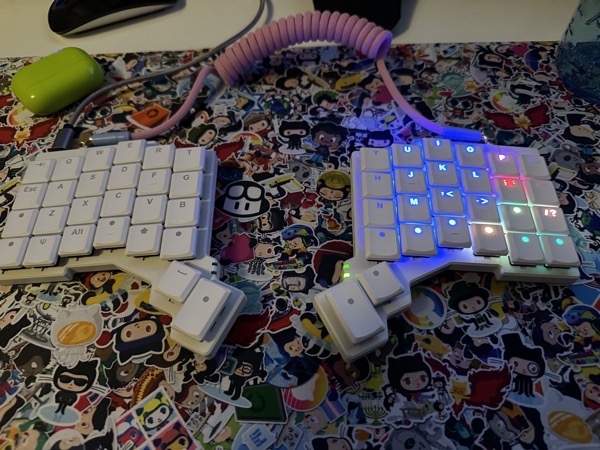
And since each keyswitch has its own RGB light beneath it, you can fully customize key colors if you like. My favorite use case is my number pad RGB layout that helps me easily tell which numpad keys are which.
My Particular Layout
Of course, with a fully programmable keyboard, you know I can’t make things simple, and I am not using the Voyager’s stock layout at all.
My layout is based on the Planck keyboard’s standard layout. The Planck was the first ortholinear keyboard that I really got into typing with, and all of my ortho keyboards use a layout that is based on my lightly customized Planck layout.
This is a pretty typical Planck layout:
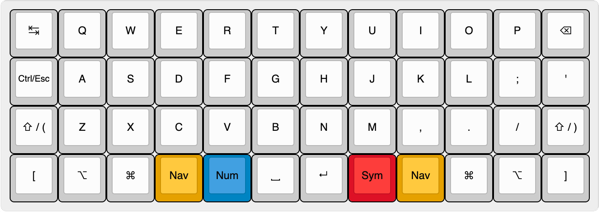
(image courtesy of https://github.com/Felerius/planck-layout)
The Planck lacks a dedicated row of number keys.
In its default layout, the Voyager does have a number row:
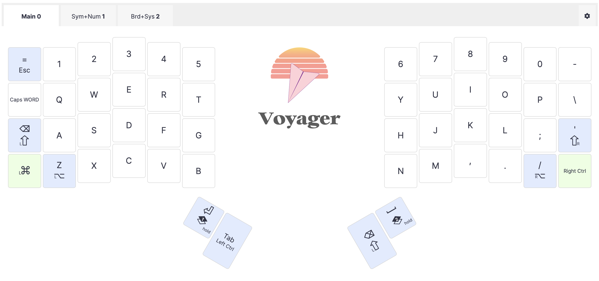
But I don’t need a dedicated number row, so my Voyager layout is based on a Planck layout, but I make use of the four extra keys.
At first this felt a little weird and unnatural, because the keyboard was made with the intent that the home row is a row lower. The thumb cluster keys feel like a bit of a reach, and the inner bottom corner keys on the main cluster are easy to accidentally hit with my thumb.
After about an hour of using it, though, I was accustomed to my modified layout and I don’t accidentally hit those corner keys much, and I assigned them the / on the left and ? on the right (and I have keys with similar roles on my Moonlander).
Customization: Hardware
The Voyager offers versatility, just like its bigger Moonlander brother. Out of the gate you can buy a tripod mount kit for your Voyager, which attaches magnetically to the bottom of the keyboard. This is handy if you want to have a bespoke setup at your home desk, but also want to be able to pick the keyboard up and pack it quickly.
I haven’t yet gotten ambitious enough to try some of these more advanced mounting options (though the chair arm mount option sounds interesting to try).
The switches are hot swappable, so if you decide you want your typing to have a whole different feel, you can. You can even mix different switches on different keys (I’ve done this on other keyboards where I use a switch with a heavier spring on the easy-to-reach keys, and a lighter switch on the ones further away, so it feels even). You can switch out your keycaps too, but Choc switches use a different style of key cap and there isn’t the same vast selection out there. But that’s okay because the stock key caps feel excellent.
The Voyager’s magnetic feet actually use magnets that can be removed from the feet to be used as donor magnets for custom mounting gear you might want to design yourself or 3D print.
So many consumer electronic products are designed by companies that just want you to blindly consume them, exactly as-is, never thinking about the other things they could do. Cracking open a product’s case usually voids the warranty. But the Voyager, like all of ZSA’s keyboards, bucks that trend. It wants you to customize it. And I really welcome products that challenge the status quo of our relationships with the everyday tools we use.
The Moonlander, To Go
If you’re in the market for a great ergonomic desktop keyboard and you’re not afraid of a learning curve and you like to be able to customize just about everything, the Moonlander remains my default recommendation (and I am happy to say I know several happy Moonlander users that got one on my recommendation). I think if you’ve got the space for it, you’ll get the best typing experience on a keyboard with full-height switches. I also like to use sculpted key caps to help my thumbs differentiate the more far-reaching keys from one another.
But if you want a travel keyboard or prefer a smaller footprint, the Voyager may well be for you. It’s a smaller keyboard, and it does have fewer keys, and that might be intimidating at first, especially since the Moonlander’s 70 keys already might feel like too few, but believe me, you will be surprised at how little you miss the extra keys once you have a layout you like (in fact, when you go back to a fuller-sized keyboard you’ll likely be annoyed with the extra keys getting in your way).
But the Voyager manages to retain just about everything that makes the Moonlander a great keyboard, retaining incredible customizability and comfort while shedding a lot of volume. It’s a keyboard you’ll happily set up at your desk, and because it’s so travel-friendly you’ll be happy to be able to bring one more comfort of home with you.
The Voyager isn’t an impulse purchase (unless you’re a crazy keyboard enthusiast like I am); at $365 it’s a commitment of a purchase, but as soon as you unbox it you’ll immediately feel the build quality, and ZSA backs it up with a solid 2 year warranty with support people who are real human beings who are always a delight to talk to when you have trouble with something.
And best of all, this isn’t some crowdfunding campaign run by someone who never made a keyboard before where you’ll pledge your money and then get signed up for a newsletter about a team who learns from first principles that manufacturing stuff is hard and prone to delays; ZSA was taking orders the day they announced the Voyager and they were shipping by the end of the week. As of right now if you order one it’ll ship within a few weeks.
Leave a Reply